Displaying adsense ads after post title can increase your CTR(Click through rate) as has been done in Digital Inspiration. CTR rate plays a very important role in fixing your adsense revenue. Here is the easiest procedure to display adsense ads:
Step1: Log in to your adsense account from the Dashboard and generate HTML code.
Step2: Convert this normal HTML code into a Parsed adsense code because normal HTML code can not be inserted in the xml template. There are 2 methods of parsing your adsense code.
First: Automatic parsing of code using a software/website. It can be done using AdParser or Centricle.com
Second: Do it manually as explained below:
Replace <with < etc...
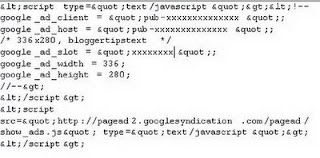
Step 3: After parsing, your adsense ad code should look like this:
 Step 4: To Set the Alignment of your adsense ads , append adsense code as below:
<div style=”float: left; width: auto; height: auto;”>Step1: Log in to your adsense account from the Dashboard and generate HTML code.
Step2: Convert this normal HTML code into a Parsed adsense code because normal HTML code can not be inserted in the xml template. There are 2 methods of parsing your adsense code.
First: Automatic parsing of code using a software/website. It can be done using AdParser or Centricle.com
Second: Do it manually as explained below:
Replace <with < etc...
Step 3: After parsing, your adsense ad code should look like this:
 Step 4: To Set the Alignment of your adsense ads , append adsense code as below:
Cut and paste your Parsed Adsense Code Here
</div>
Replace "left" with "center" or "right" for desired alignment.
Step 5: Log in to your dashboard Go to Layout> Edit HTML
Click on "Expand Widget Template" and Download your template in case you want to revert to original template.
Step 6: Adsense ads can be displayed in different locations:
1.Below post header/title
2.At the end of Post Body
1. How to display ads below Post Header/title:
-Scroll down/Find the following code line:
-Scroll down/Find the following code line:
<data:post.body/>
Here is the XML code which i have used in my XML(Minima White)template:
<div class='post-header-line-1'>
<span class='post-comment-link'>
<b:if cond='data:blog.pageType != "item"'>
<b:if cond='data:post.allowComments'>
<a class='comment-link' expr:href='data:post.addCommentUrl' expr:onclick='data:post.addCommentOnclick'><b:if cond='data:post.numComments == 1'>1 <data:top.commentLabel/><b:else/><data:post.numComments/> <data:top.commentLabelPlural/></b:if></a>
</b:if>
</b:if>
</span> <span class='reaction-buttons'>
<b:if cond='data:top.showReactions'>
<table border='0' cellpadding='0' cellspacing='0' width='100%'><tr>
<td class='reactions-label-cell' nowrap='nowrap' valign='top' width='1%'>
<span class='reactions-label'>
<data:top.reactionsLabel/></span> </td>
<td><iframe allowtransparency='true' class='reactions-iframe' expr:src='data:post.reactionsUrl' frameborder='0' name='reactions' scrolling='no'/></td>
</tr></table>
</b:if>
</span> </div>
<div class='post-body entry-content'>
Paste Your Parsed Adsense code here(To wrap below Post title)
<data:post.body/>
<div style='clear: both;'/> <!-- clear for photos floats -->
</div>
<center><div>
Paste Your Parsed Adsense code here(To wrap in end of Post)
<div class='post-footer'>


0 comments:
Post a Comment